Minimalist Home Wifi Project

Trying to look like my network isn’t a giant mess
Like most people, my home network was a mess. Things were setup so they worked and left in place connected with whatever was handy and not touched again unless something was wrong. It’s not that I didn’t want to build an organized network setup, it’s more I had more excuses not to bother. The final motivation that got me to act was my son’s VR needing its own network and the lack of wifi coverage in parts of the house.
What I had to work with
Huawei
I didn’t choose the Huawei life, the Huawei life choose me. Or, my internet provider gave me this router and for now I am stuck with it. “But Tim, doesn’t your neighborhood have fiber?” It does, and we decided against it. It’s a complicated topic for a later post. The router is a B525s-23a. I know it’s lacking a SMA terminator, it’s on my to-do list. Eventually we will upgrade to a 5G router, possibly a Mikrotik Chateau if the budget allows. Right now we have 42Mbps down, 8Mbps up and its good enough.
Mikrotik
Mikrotik is an interesting trade-off. From the starting point of this project I had a collected 3 Mikrotik wAPs, 1 Mikrotik hAP ac2 and a Mikrotik hEX Lite PoE.
Homesmart
In addition to the network changes, I bought myself an IKEA Dirigera controller for the Trådfri lights we already had. Eventually, I hope to add OpenHAB and connect my garage doors and heating systems.
IKEA Skådis
I have used IKEA Skådis boards elsewhere in the house to hold my son’s Playstation and controllers and to hold some of his computer accessories. I’ve always had the idea of using one to mount all my network components since I saw a YouTube video where everything was neatly organized on the presenters wall. The new standalone Skådis was perfect for what I wanted to accomplish. I could put the network components on the front of the board and hide the PSUs and cables on the back.
RPI
I have a collection of old Raspberry Pis from other projects. I added one of them to this project to run extra services.
Cables
All the cables came from 1Attack and purchased via Amazon. They were an order of magnitude cheaper than buying them locally.
The Install Process
Mikrotik Prep
To ensure we start from a known state, I factory reset all the components then upgraded them and performed basic security actions on them. The wAPs are actually out of production so it is nice to see they can still run the latest RouterOS. My old Ubiquiti AP became locked to its controller and was unable to be upgraded once it reached EoL status.
PoE Testing
To keep this cheap and simple, I planned to use PoE provided from the hEX to run the wAPs. Since two of the cables runs were rather long, I had to test that the hEX could power all 3 APs even with the voltage drop in the long cable runs. It was also important to test that load of all the APs rebooting at the same time didn’t overload the PoE power supply. Everything worked when tested in my living room.
Network Design
First order of business was to move my son’s gaming over to it’s own wifi router. In his room I have setup the hAP ac2 and connected his PC via ethernet and his VR headset via 5GHz wifi.
The house network consists of 3 APs in 2.4GHz. One for the office and bedrooms, one for the living room and one that covers the kitchen, garage and hopefully outside.
Color Coding
Since we are being all fancy and ordering cables instead of just using whatever is laying around, I picked white cables for connections behind the Mikrotik router’s NAT and yellow cables for anything connected to the DMZ between the Huawei and the Mikrotiks.
Mounting devices to the Skådis
With no real plan, I bought some bolts and nuts to match the mounting holes on the Mikrotiks and some washers to help attach them to the Skådis holes. I didn’t really work out as planned. It’s difficult to tighten them once they are put in place and the holes on the hardware didn’t always line up to the Skådis. In the end I used a combination of zipties and bungees for most things.
I bought an IKEA Koppla to plug all the devices into. This allowed me to power both the Raspberry Pi and the Dirigera via USB directly from the Koppla and skip having to mount two USB power supplies to the back side of the Skådis.
Issues and their resolution
Wifi Channel Selection and Overlap
Initially, the routes would pick their own frequencies and often these frequencies overlapped. Suggestions from some Mikrotik forums were to make sure the frequencies did not overlap.
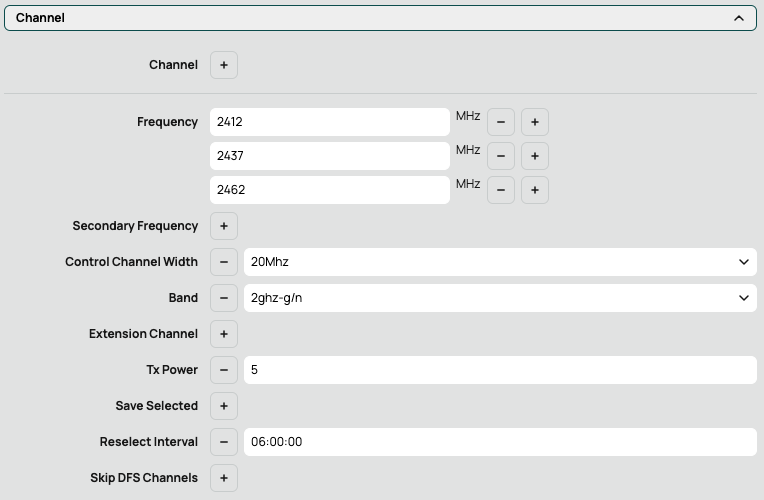
I also ensured the network only uses 20MHz channel width and 802.11g/n, excluding 802.11b. I have lowered the TX power to 5 and set a 6 hour reselect timer so the APs reselect one of the three frequencies after 6 hours. Some scans of the local wifi networks using my laptop seem to indicate there are transient networks which sometimes overlap with my network and cause issues.
Wifi Network Tuning
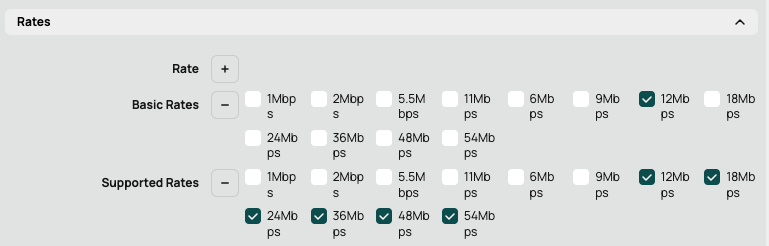
I also set the rates which the network sets as a minimum and what rates are allowed. This should improve channel usage and prevent legacy wifi devices from connecting. It was a suggested setting in the Mikrotik forums.
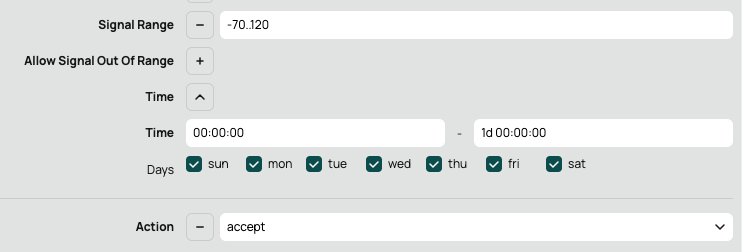
I also found a setting for limiting which devices can connect by signal level. This setting forces devices with poor signal levels to disconnect and should help force devices to select one of the other CAPs when roaming through the house. Essentially this ACL allows signals from devices to remain connected while a blanket drop ACL sits below it.

It seemed to improve stability once in place.
One more recent issue has been with ping times and weird connectivity issues to local devices like the RPI. I suspect this has to do with how the datapath was configured. There are 2 main ways of configuring the datapath. One way is to use the CAPs local network to connect and the other is to tunnel the datapath to the CAPsMAN router so CAPsMAN controls the traffic. I tried to keep this simple and allowed local forwarding, which skips the CAPsMAN tunnel and client to client which should help with two devices sending to each other.

Monitoring
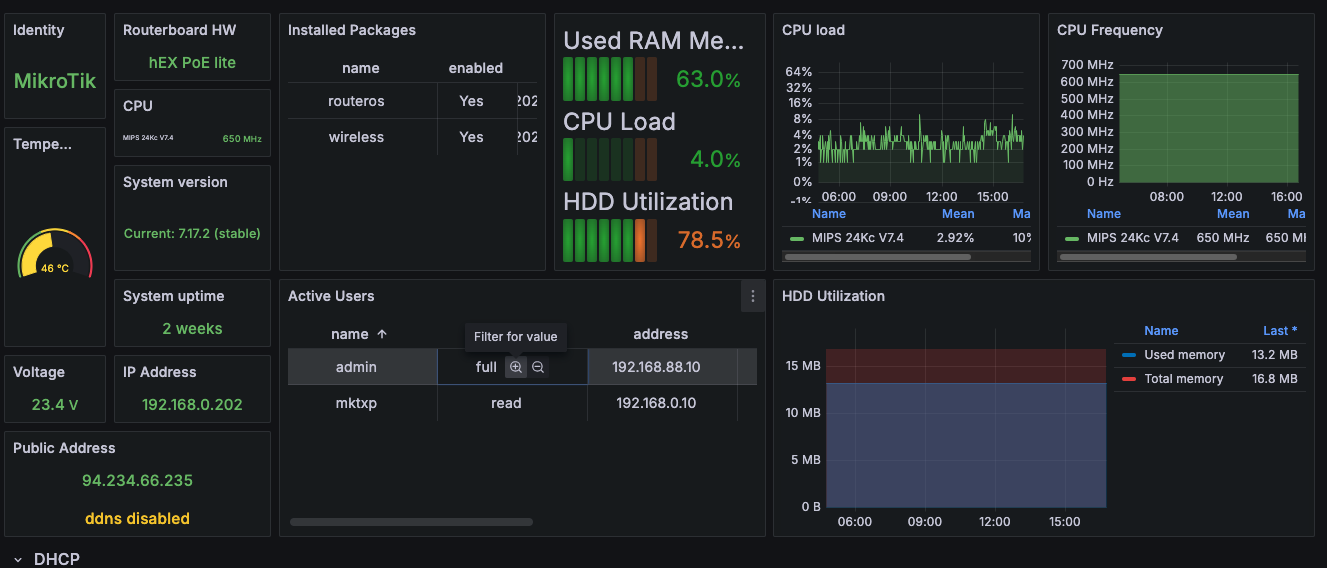 I needed a better way to monitor my network than just the Mikrotik GUI. I found this Mikrotik Prometheus exporter MKTXP on GitHub. It was easy to install in Docker on the RaspberryPi and easy to configure to monitor both the hEX and CAPs as well as the Mikrotik hAP ac I put in my son’s room for his gaming and VR.
I setup the Huawei LTE exporter as well and was getting data from the Huawei via a Docker container but it seemed to cause problems with the Huawei router, sometimes it would open too many sessions and I couldn’t login or sometimes it would drop data. When time allows I may try to recreate this in Golang as an open source project, but I might end up swapping the Huawei out as I mentioned earlier.
Somehow Neat is Ugly
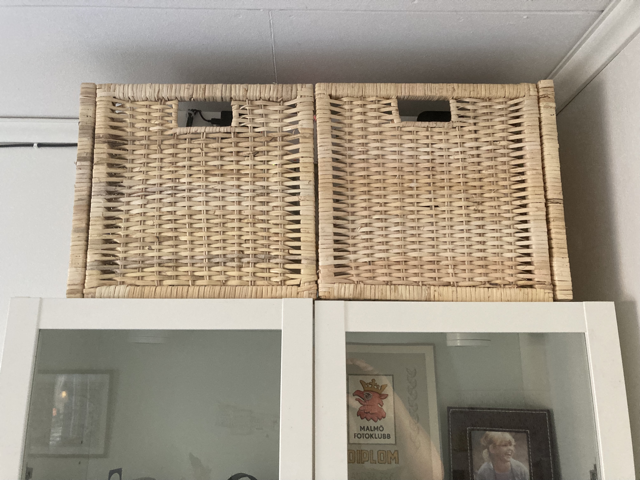
As excited as I was about having organized our router and wifi setup, my wife didn’t think guests would be so keen on it being a prominent feature in our office/guest bedroom. The solution I came up with was to buy an IKEA Branäs storage box and cut it up to look like two boxes side by side. It was held together by plastic straps that were stapled in place. I used some old metal brackets I found in my garage and small screws to hold the sides together. Apart from the red LED light on the router, it doesn’t appear to be anything more than extra storage and Linda is happy.
I also added the Pihole Exporter to docker on the RPI to get stats from Pihole. The RPI was often running low on disk and my Grafana free account will store the data for 30 days so this seemed like a good idea. I like having everything in one dashboard in Grafana and it has helped me troubleshoot things remotely when not at home.
TODO
- I need to buy a terminator for the RF port on the LTE router.
- I need to setup the config of the router as code that can be managed and deployed from Git.
- I need to setup the RPI as code so the config sits in Git.
